Our First Solar Hot Water Experiment
When Patrick and I arrived at Avalon our trailer was equipped with a 40 gallon refillable water tank and no hot water system. Every few days we had to refill the tank using a garden hose that was attached to an outdoor spigot. Our living situation was greatly improved by connecting to a 1600 gallon water tank. We no longer had to fill the 40 gallon tank and water was readily available at the trailer faucets. Even so, water had to be boiled for dish washing and we used the shower at our neighbor's house.
 While rustic living had its appeal, we discovered that trailers are designed to rely heavily on propane. The quest for sustainability lead us to seek propane alternatives for heating water. That's when Patrick and I began designing our first solar hot water heater.
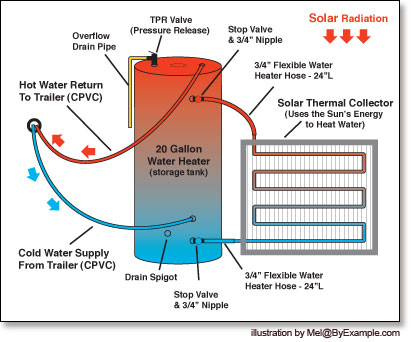
First, Patrick drew up a basic diagram of how the collector would work.
Our homemade flat panel collector is designed to capture the sun's energy to heat cold water. In this design there are two parts: the hot water storage tank and a flat panel solar thermal collector. A cold water feed line from the trailer moves water into the bottom of the storage tank. A cold water line then carries water from the tank into the collector.
The collector utilizes copper pipes to carry water through the sealed collector box. Clear glazing affixed to the face of the collector allows the suns rays to directly strike the copper pipe to heat the water. As the water becomes warmer it rises to the top of the collector. A hose leads the hot water from the top of the collector back into the water storage tank.
 Cold water feeds into the bottom of the tank and continues to move through the collector while the sun is out. The hot water stays at the top of the tank, while cold water sinks to the bottom. Another hose from the very top of the tank carries the hottest water into the trailer for use. A TPR valve at the top releases excess thermal pressure.
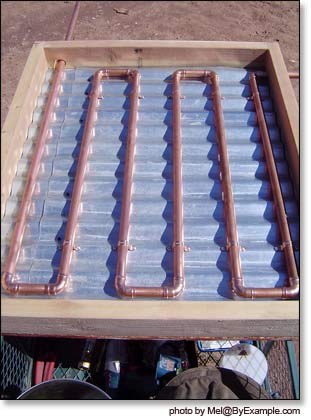
After much planning we purchased our materials: acrylic sheet for glazing, 2x4s, plywood, copper pipes, elbow joints, and soldering supplies.
We designed the collector housing to the size of our glazing. It's built with a plywood back and a frame of 2x4s. This box holds the copper pipes which coil back and forth and then connect into the hot water tank. All in all this box box was not insulated properly. We learned from our second collector experiment that double walls with Styrofoam insulation in between works very well to trap heat. The single sheet of plywood used for the back of the collector was a source of significant heat loss.
In this experiment we used corrugated steel to line the bottom. It did not seem to increase the efficiency of the collector. In fact, had we affixed the pipes directly to a flat black aluminum sheet we would have increased the heat sink. To clarify, there would be a greater area of pipe touching the flat black aluminum. The black aluminum would absorb heat and conduct it into the pipes and ultimately into the water at greater rate.
 However the most effective solution may be to finish the inside of the box with a reflective material, and to paint only the pipes black. We learned in the batch collector experiment that reflecting heat and light away from the collector box concentrates the sun's energy directly on the water. The box stays cool and the water gets hotter faster.
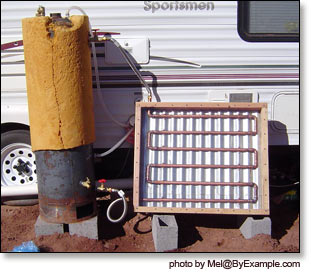
After all the pipes were soldered, we connected the flat panel collector to a salvaged hot water tank. All in all, the storage tank was never properly insulated. Eventually we wrapped it in bubble wrap and tarps and used packing peanuts for increased insulation. Better insulation on the tank would have helped us to retain our hot water longer, though in the summer had no need for improved efficiency. It consistently produced hot water on sunny days.
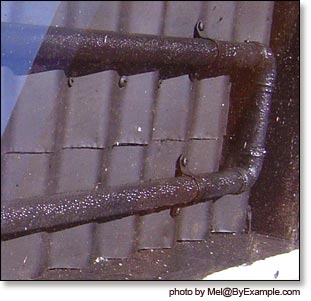
We spray painted the collector with black engine enamel to increase its heat absorption. Despite our efforts to seal out water, moisture eventually became trapped inside the collector and began eroding the paint. The moisture also blocked light from getting into the collector.
When we attached the glazing to the front we pre-drilled holes into acrylic sheet, and then attached it to the wood frame using screws. First, caulk was used between the acrylic and the wood to achieve a seal. Though, eventually we replaced the caulk with adhesive foam tape, a more practical solution.
 Double paned glass is the ideal solution for collector glazing. It offers maximum insulation. In the collector the acrylic sheet eventually cracked at all of the holes. The acrylic cracked after only a few months of constant exposure to the sun. We replaced it with a single paned window which increased the collector's efficiency drastically.
While this collector provided us with hot water daily during the summer, it did not weather the winter. Insulating the exposed pipes helped some, but the collector met it's demise when an unexpected freeze burst a copper pipe. We considered repairing it, but it was obvious that this design was not suited for winter weather. It simply lacked good insulation. We decided instead to make a batch collector. We plan to put our first flat panel collector back into operation during summer months, but it needs a bit of repair work first!
We spent less than $200 on this collector! It was pretty simple to make. Many of the materials were recycled and were free to us. The biggest expenditure was on plumbing fittings to attach the collector to the hot water tank.
I would recommend this style of homemade collector for summer use, it could work particularly well for an out door shower. Patrick and I have learned though, that solar hot water can get extremely hot. We are currently working to install an anti-scald system, which is necessary to use with our newer and more efficient collector.
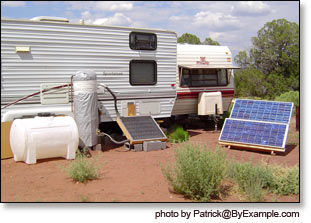 A photo of our homemade flat panel collector and semi-insulated tank producing hot-water.
To read about our second solar hot water experiment click here.