Greenhouse Construction Phase I: Concrete Foundation
After we installed the utilities for our future homestead we began construction of the first major structure, our passive solar greenhouse. We chose to start with the greenhouse in order to get a better sense of the construction process before attempting the larger task of building our house. Insight gleaned while building the greenhouse has most definitely influenced our building plans and choice of construction materials for our passive solar home, which we plan to build over the next few years.
DIY Concrete Foundation
With help from our family members and friends we were able to design and install the concrete footers and foundation for our passive solar greenhouse. Fortunately the folks who helped us with this project had a fair bit of experience working with concrete.
Calculating the Concrete Foundation
The first challenge in creating the concrete pad was to determine how much concrete needed to be delivered to the site. We followed the specs outlined in the diagram below when digging the foundation site and used the measurements to calculate the total amount of concrete that we would need to do the job.
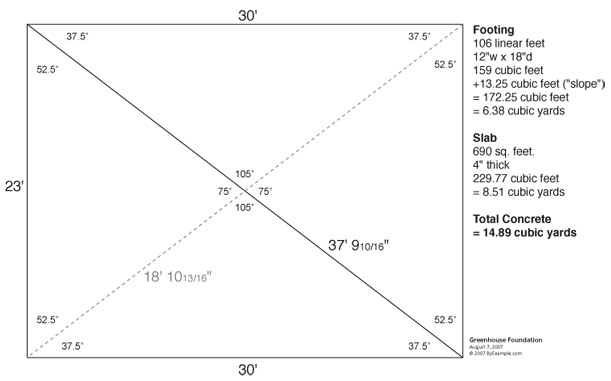
Click here to download calculations for the concrete slab and footings for our greenhouse in PDF format.
Preparing the Construction Site
In the weeks before concrete delivery many hours were spent preparing the site. With a borrowed tractor we dug the 12" wide x 18" deep footers and then leveled out the site. We used rigid foil backed insulation to line the outer perimeter of the footers and a combination of 2" x 6" and 2" x 8" lumber to frame up the slab.
Before the concrete pour we also ran water, sewer and phone lines into the structure. Because concrete expands during the curing process we wrapped each of the utility pipes in foam to protect them from cracking under pressure.
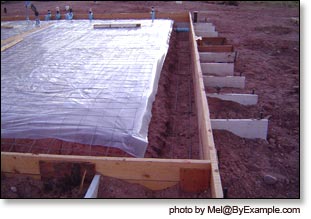
We lined the pad with plastic sheet to serve as a moisture barrier, which we tacked into the dirt with long nails. On top we layered remesh wire as a preventative measure to keep the concrete slab from cracking. Last, we gathered our concrete tools: heavy rubber gloves, boots, rakes, shovels, hoes, wheel barrow, screeding board, bull float, brush for flicking water, buckets, finishing trowels, and kneeler boards. We also made sure that we had a hose on had to deliver water to the construction site from our well and we dug a "clean out" pit for the concrete truck to rinse the chute.
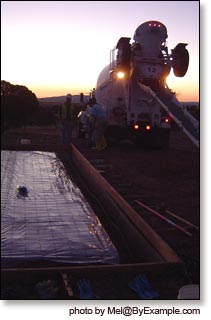
Pouring the Concrete
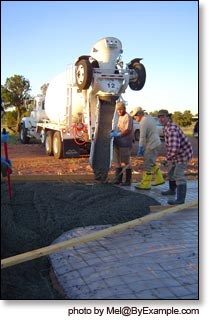
To our surprise the concrete truck came earlier than scheduled -- arriving before the sun was even up! Fortunately our crew of friends also arrived early and we were able to begin as the first rays of light hit the ground.

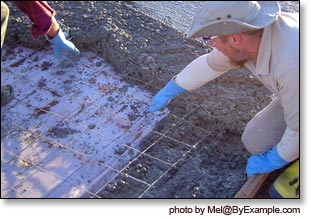
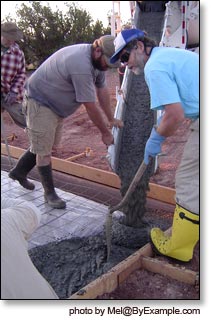
Using hand signals to communicate to the operator of the concrete truck was key to getting the concrete in the right place and at the best speed. As it flowed out the chute we used rakes and shovels to spread the concrete into the footers and to fill the form. During this process the remesh is lifted so that it becomes suspended it in the concrete.
Screeding the Concrete
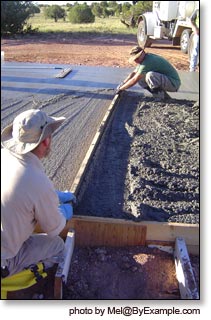
Once the concrete was relatively spread out screeding began. When screeding, two people work with a long board to level the slab. In this project one end of the screed board rested on the outer edge of the form and the other end was rested on a board temporarily positioned at the center of the pad. Using a motion that is sort of like sawing back and forth we worked the concrete slab worked until it was as level as possible.
Concrete Finishing
The next step was finishing and smoothing the concrete. We used a bull float to work out the screeding lines and create a smooth surface. Because of its extra long handle the bull float allowed us to work on the center of the slab from the edge of the pad.
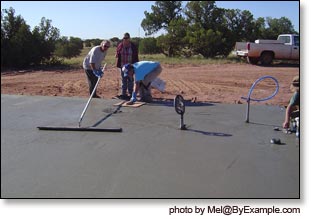
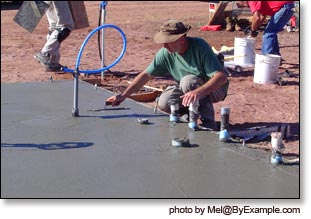
For the last stage of finishing we used kneeler boards constructed from plywood and 2" x 4" lumber, which allowed us to work while kneeling directly on the freshly poured concrete. At this stage we used large floppy brushes to flick water onto the concrete pad. The extra moisture helped to keep the surface from drying to quickly, while several people used hand trowels to achieve the final finish.
In addition to all the steps mentioned above it is critical to keep the tools clean at all times or the concrete will harden and ruin them. Fortunately we had plenty of bodies to help out with this and all went smoothly.
Concrete Pillars and Pavers
We over calculated the amount of our concrete order intentionally, because we did not want to run the risk of being short. Also, we planned and prepped several projects in addition to the greenhouse foundation for using up any extra concrete. As it turned out we had plenty of uses for the excess: concrete pillars for the greenhouse porch, a 10' x 20' auto pad and a half dozen concrete pavers.
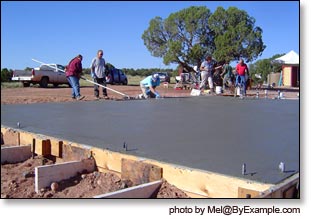
Throughout the morning, from about 6AM to 1PM, there were 8 to 10 people working with us at all times to get the concrete poured. We needed every single person that was there to help and when we were done, all were exhausted! Pouring the concrete was physically very intensive and required constant movement to get the job done.
Photo Gallery
To see more photos taken during the construction of our passive solar greenhouse visit these photo galleries:
Greenhouse Construction Phase I: Concrete Foundation
Greenhouse Construction Phase II: Framing & Wiring
Greenhouse Construction Phase III: Plumbing, Insulation & Drywall